
Pests and Diseases
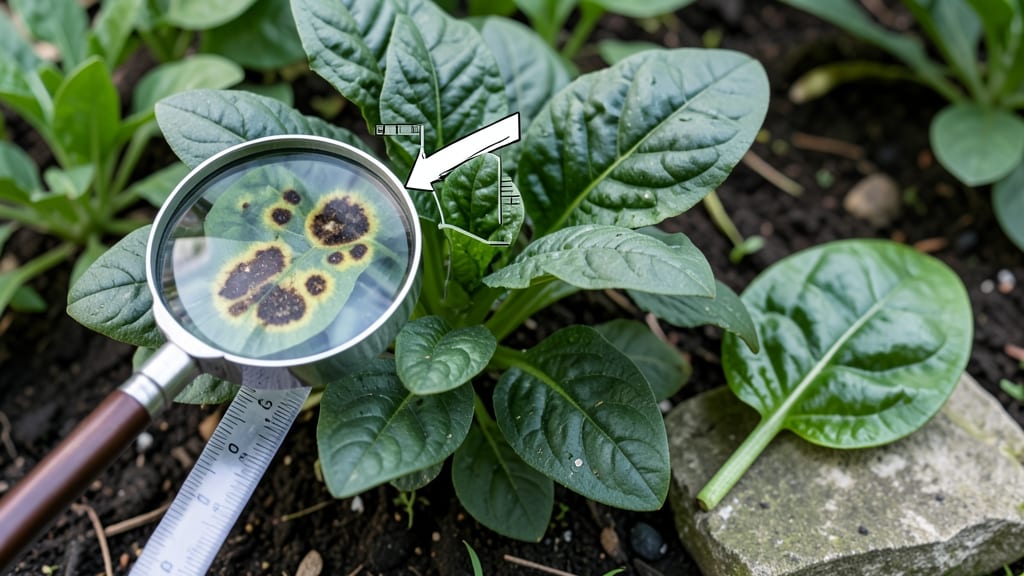
See those spinach leaf spots turning your spinach into a sad, speckled mess? 🌱 I’ve seen this disease ruin entire harvests—and the good news is, you can stop it in its tracks with the right organic fixes.
What you’ll learn here are the fast-acting solutions that work within days, plus the long-term habits that keep your spinach thriving.
The problem starts with tiny spores from fungi like Cercospora or Alternaria, which love warm, wet conditions. You’ll spot them as dark, irregular patches that spread quickly if you don’t act.
The fix isn’t just spraying—it’s about cutting off the fungus’s food supply (that’s your spinach) while giving it no place to hide. Proper spacing, watering at the base (not overhead), and removing infected leaves are your first line of defense.
Within 3 days, you can see improvement with a simple baking soda spray (1 teaspoon per quart of water) or a mix of neem oil and mild soap. These disrupt the fungal growth without harming your plants or the soil.
The key is consistency—keep the air moving around your spinach, and you’ll break the cycle before it starts.
This works for home gardens, containers, or even balcony setups. No more throwing out spotted leaves—just healthier plants and a harvest you can actually enjoy. Let’s get those leaves looking crisp and green again.
The Hidden Triggers Behind Leaf Spots
If your spinach leaves are developing unsightly spots, the culprits are often lurking in plain sight—waiting for the right conditions to strike. Understanding why these spots appear is the first step to stopping them in their tracks.
Below, we break down the key factors that turn your lush spinach into a spotted mess, backed by science and actionable insights.
Fungal pathogens like Cercospora or Alternaria (common leaf spot culprits) thrive in wet, stagnant conditions. When spinach sits in soggy soil or waterlogged beds, spores germinate rapidly, piercing leaf tissue to create those telltale dark spots.
- Why it happens: Excess moisture softens leaf cuticles, making them vulnerable to fungal penetration. Poor drainage traps water at the roots, while overhead irrigation splashes spores onto leaves, creating a perfect infection cycle.
- Actionable fix:
- ✅ Test your soil: Dig a hole 12 inches deep—if water pools after 30 minutes, amend with compost or sand to improve drainage.
- ✅ Water wisely: Use drip irrigation or soaker hoses to deliver water at the base, avoiding leaf surfaces. Aim for 1–1.5 inches per week, adjusting for rain.
- ✅ Space plants properly: Crowded spinach creates a humid microclimate. Thin seedlings to 4–6 inches apart for airflow.
Leaf spot fungi are opportunistic. They survive in soil, plant debris, or even on neighboring crops, waiting for a weakened host. Wind, rain, or even your gardening tools can spread them like wildfire.
- Why it happens:
- Spores land on leaves and germinate when conditions are humid (70%+ RH) and warm (60–85°F).
- Old crop residues (like last year’s spinach stems) harbor spores, reinfecting new plants.
- Monocropping spinach year after year exhausts soil defenses and builds up fungal populations.
- Actionable fix:
- 🔄 Rotate crops: Avoid planting spinach (or other greens) in the same spot for 3+ years. Swap with brassicas (kale, cabbage) or legumes.
- 🧹 Clean up debris: Remove and compost (not reuse!) infected plant material. Solarize soil in late summer by covering it with clear plastic for 4–6 weeks to kill spores.
- 🌬️ Monitor weather: Leaf spots flare during prolonged humidity (e.g., rainy springs). Use a soil moisture sensor to time watering.
Spinach is a cool-season crop, and extreme temperatures—whether too hot or too cold—weaken its natural defenses, making it an easy target for fungal invaders.
- Why it happens:
- Heat stress (above 80°F): High temps reduce chlorophyll production, causing yellowing and thinning leaves—perfect entry points for fungi.
- Cold snaps (below 40°F): Chilling injury disrupts cell membranes, making leaves more permeable to pathogens.
- Nutrient deficiencies (e.g., magnesium, nitrogen): Weak plants can’t fend off infections. Spots often appear near yellowing veins (a classic magnesium deficiency sign).
- Actionable fix:
- 🌿 Choose heat-tolerant varieties: Opt for ‘Tyee’ or ‘Bloomsdale Long Standing’, bred to handle warmer springs.
- 💧 Mulch to moderate temps: Apply 2–3 inches of straw or shredded leaves to insulate roots and retain moisture.
- 🍽️ Fertilize strategically: Side-dress with compost or fish emulsion at planting and mid-season to boost nitrogen. For magnesium, spray leaves with Epsom salt solution (1 tbsp/gallon) weekly.
Pests like aphids, flea beetles, or slugs don’t just chew leaves—they create wounds that fungi exploit. A single beetle bite can turn into a fungal hotspot within days.
- Why it happens:
- Insect saliva contains sugars that feed fungal growth.
- Beetle holes expose mesophyll cells, inviting spores to colonize.
- Slugs leave slime trails that trap moisture, accelerating spore germination.
- Actionable fix:
- 🐌 Set traps: Use beer traps (for slugs) or yellow sticky cards (for aphids) to monitor populations.
- 🛡️ Protect young plants: Cover seedlings with floating row covers until established (remove when flowering to allow pollinators).
- 💦 Spray neem oil: Apply 1% neem oil solution at dusk to deter insects without harming beneficials.
Now that you know the real culprits behind those pesky spots, the next step is organic treatments to kick them to the curb—fast. 🚀
Quick Fixes for Fungal Spots
Fungal spots on your spinach leaves can feel like a sudden storm—unexpected and frustrating. But don’t worry! With the right approach, you can revive your plants in just 3 days and prevent future outbreaks.
Below, we’ve mapped out practical, organic solutions tailored to the root cause of the problem, from improving air circulation to natural fungicides. Follow these steps, and your spinach will be back to thriving in no time.
---
Cause: Poor air circulation traps moisture, creating the perfect breeding ground for fungal spores.
How to Fix It: - 🔥 Thin Out Plants: Space spinach plants 6–12 inches apart (depending on variety) to allow air to flow freely between leaves. - 🍳 Prune Strategically: Remove yellow or heavily spotted leaves immediately—they’re fungal hotspots. Snip them at the base with sterilized scissors (wipe with rubbing alcohol between cuts). - 👨🍳 Adjust Watering: Water early in the morning (before 10 AM) so leaves dry quickly. Avoid overhead sprinkling—use a soaker hose or drip irrigation instead. - 🥘 Elevate Beds (If Possible): If growing in containers or raised beds, ensure they’re at least 6 inches off the ground to improve drainage and airflow.
💡 Pro Tip: If your garden is shaded, consider adding a small fan on a low setting (like a USB-powered clip-on fan) to gently circulate air around plants. This mimics natural breezes and deters fungal growth.
---
Cause: Excess humidity or soggy soil weakens plants, making them vulnerable to fungal infections.
How to Fix It: - ⏰ Water Deeply but Less Often: Instead of daily light watering, soak the soil deeply 2–3 times per week (adjust based on your climate). Let the top 1–2 inches of soil dry out between waterings. - 🔪 Improve Drainage: Amend heavy or compacted soil with compost or perlite to help water drain faster. If growing in pots, ensure they have drainage holes. - 🌡️ Mulch Smartly: Use straw or shredded leaves (not wood chips, which can retain too much moisture) to keep soil temperature stable and reduce evaporation.
✨ Prevention Hack: If your area is prone to high humidity, plant spinach in late summer or early fall when nights are cooler and dew is less likely to linger.
---
Cause: Existing fungal spores need to be killed or suppressed to stop the spread.
How to Fix It: Use these DIY sprays every 3–4 days until new growth appears (usually 3–7 days). Always spray early in the day so leaves dry quickly.
| Solution | How to Make It | How to Apply | |----------------------------|-----------------------------------------------------------------------------------|---------------------------------------------------------------------------------| | Baking Soda Spray | Mix 1 tsp baking soda + 1 tbsp vegetable oil + 1 tsp mild soap in 1 quart water. | Shake well and spray undersides of leaves (where spores hide). | | Neem Oil Spray | Combine 1 tbsp neem oil + 1 tsp soap in 1 quart water. | Spray evenly, avoiding direct sun (can burn leaves). | | Milk Spray | Use raw milk (or 1 part milk to 9 parts water). | Spray directly on spots—milk contains compounds that inhibit fungal growth. | | Copper Fungicide | Use organic copper-based spray (like Bordeaux mixture) as a last resort. | Follow label instructions; avoid if bees are active (copper is toxic to them). |
💡 Pro Tip: For severe infections, alternate between baking soda and neem oil every other day. Neem oil disrupts fungal spores, while baking soda raises the leaf’s pH, making it inhospitable to fungi.
---
Cause: Weak or nutrient-deficient plants are easier targets for fungi.
How to Fix It: - 📊 Feed with Compost Tea: Brew compost tea (steep compost in water for 24–48 hours, strain) and water plants with it weekly. It introduces beneficial microbes that crowd out pathogens. - 💪 Add Potassium & Phosphorus: Fungal stress is often linked to low potassium (K). Side-dress with wood ash (sparingly) or use a liquid fish emulsion (1 tbsp per gallon of water) every 2 weeks. - 🥗 Interplant with Fungus Fighters: Grow garlic, chives, or marigolds nearby—they release antifungal compounds into the soil.
🎯 Long-Term Prevention: - Rotate crops: Don’t plant spinach (or other greens) in the same spot next year. Wait at least 3 years before replanting. - Solarize soil (for stubborn cases): Cover beds with clear plastic for 4–6 weeks in hot sun to kill fungal spores in the soil.
--- Final Note: Consistency is key! Check plants daily for new spots, and act fast—fungal infections spread quickly. With these steps, your spinach should bounce back within a week and stay healthy for the rest of the season. 🚀
Frequently asked questions
What do spinach leaf spots look like?
Leaf spots on spinach usually appear as irregular, dark brown or black patches with yellow halos. They often start small but grow larger over time, sometimes with grayish centers. In advanced cases, the spots may merge, causing leaves to yellow and crisp.
How quickly can leaf spots spread on spinach?
Under ideal conditions (high humidity and warmth), fungal leaf spots can spread within 3-5 days if left untreated. Spores release into the air, infecting nearby plants rapidly. Early intervention with sprays and proper spacing slows this process significantly.
Can I still harvest spinach with leaf spots?
Yes, but remove only the severely infected leaves—the rest can still be harvested. Wash thoroughly before eating. Avoid harvesting from heavily spotted plants, as the spots may contain fungal spores that could contaminate your food.
Will rain make leaf spots worse?
Rain spreads fungal spores through water droplets, accelerating infection. After heavy rain, inspect your spinach and apply a baking soda or neem oil spray to protect leaves. Watering in the morning helps leaves dry faster, reducing fungal growth.
How do I prevent leaf spots next season?
Start with crop rotation—avoid planting spinach in the same spot for at least 3 years. Use resistant varieties like 'Tyee', practice proper spacing, and maintain good airflow. Solarizing soil in summer kills fungal spores before replanting.